Intuitively, most people have an understanding of hardness, even if they can’t provide a metallurgically correct definition.
Most people have an idea of strength as well, although most non-technical people may not be aware that any given material has a number of different properties that fall under the category of strength (yield strength, tensile strength, fatigue strength, impact strength, etc.). The terms "hardness" and "strength" may even be conflated for many people.
It is true that hardness and tensile strength correlate fairly well with one another. So, the first question that needs to be addressed is, “Can I use hardness test results to make any judgements on the strength of my material?” The short answer is “Yes” but take it with a grain of salt.
Perhaps it is best to start with the promised metallurgically correct definition of hardness. “Hardness is a material’s resistance to permanent indentation by a given indenter at a particular loading condition.” The bigger and deeper the indentation, the lower the hardness and vice versa. The three critical components of the test are the indenter (sharp object pressed into the surface), the load used during the test, and the scale (measurement system used to quantify the results.)
Hardness is really a quasi-mechanical property, as it is actually a function of several other mechanical properties. Those properties include elastic modulus, yield strength and tensile strength, which all influence how far the indenter penetrates under a given load, and how much the material springs back when the indenter is removed. So, there are additional questions that would need to be addressed.
Question: How useful is hardness testing?
Answer: It depends. Done properly, hardness testing can be fairly reliable and repeatable. If not done properly, you will find yourself chasing variation, rejecting good parts, accepting defective parts, etc.
On the positive side:
On the negative side:

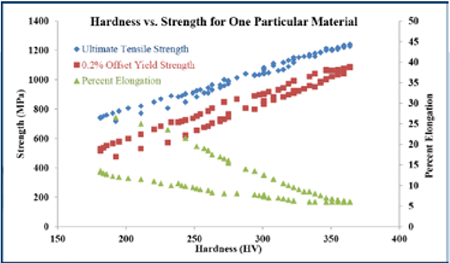
Figure 1: Hardness and Tensile Property Correlation (or Lack Thereof).
Tensile strength and hardness correlate fairly well. There is more spread in yield strength, and a greater amount of spread in ductility (percent elongation.) This chart is for one particular material in multiple heat treat conditions, and should not be used as a conversion chart.
Question: Can I use hardness testing to accept/ reject incoming material?
Answer: If you are testing hardness on a different scale than the one used on the material certification, then proceed with extreme caution. If you test on the same hardness scale using the same scale, load, indenter and dwell time, and your measurement is close to the certified value, the error is probably test variation and you can feel confident. If you screen incoming material by measuring yield or tensile strength, you will probably measure within 1% of the certified values. With hardness, who knows?

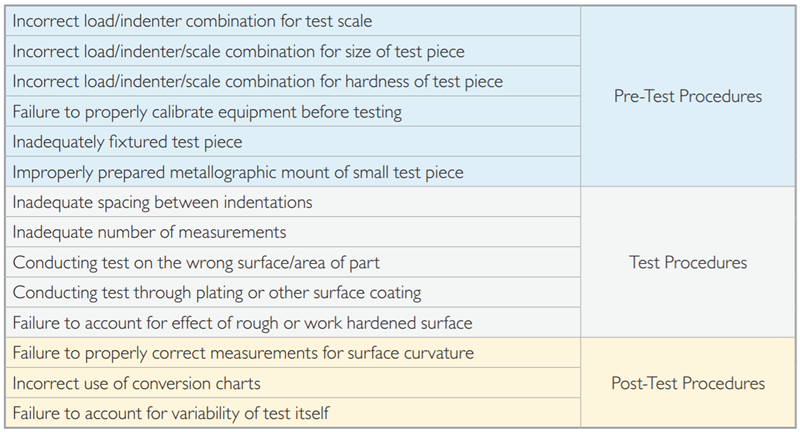
Figure 2: Potential Pitfalls of Hardness Testing.
The first 13 are all procedural errors that can be avoided by following standard operating procedures and using common sense. The last item is the source of most heartaches, as different machines, different labs and different operators may come up with wildly different hardness measurements. The raw material itself may have a number of constituent phases that have different hardness value, which can have a large effect on the overall measured value, particularly on microindentation tests.
Question: Can I use hardness to judge if material has been properly heat treated?
Answer: You may if you follow the specifications and guidelines, and test appropriately.
In summary, there are many caveats to using hardness testing to evaluate material condition. Hardness tests measure hardness only, and it is risky to infer other material properties from the result of the test. However, there are circumstances where hardness testing is the only possible measurement that you can make to evaluate materials. You will need to exercise good engineering judgement in deciding whether or not your parts meet your specifications when hardness is the only property you can measure. In this case, it is best used as a means of statistical process control, to see when and if the process drifts.
Learn more about how beryllium hardens and strengthens other metals when used in alloys.